Estimated read time: 8-9 minutes
This archived news story is available only for your personal, non-commercial use. Information in the story may be outdated or superseded by additional information. Reading or replaying the story in its archived form does not constitute a republication of the story.
SALT LAKE CITY — You don’t need many supplies or expenses to teach STEM (science, technology, engineering and mathematics.) STEM educators Mindy Hiatt, Susan Jeppesen and Carrie Rogers-Whitehead have brought together some simple activities with six supplies or less that you can do at home.
1. Dancing snowman automation
SUPPLIES:- Cardboard box, about 7inches by 10 inches and about 4 inches deep, and extra cardboard as needed for gears
- Two wide rubber bands, like those found on produce
- Drinking straw
- Large marshmallows
- Two wooden skewers, about 12 inches long
- One nail or piece of hangar wire, at least 3 inches long TOOLS: - Hot glue gun
- Scissors
- Push pin
- Ruler TO CREATE THE GEARS: To create the gears, draw the following shapes on the cardboard:
- Ovals: cut four that are 2 3/4 inches long and 2 inches wide. Two should be horizontal and two should be vertical to the corrugation on the cardboard.
- Circles: cut two, 3 inches in diameter
- Circles: cut two, 1 inch in diameter.
- Rectangles: cut two, 1 1/2 inches by 3 inches. Also cut these in different directions on the cardboard.

Lay the ovals on top of each other, matching the edges. With the push pin, poke a hole toward one end of the uppermost oval. Remove each oval and repeat poking the hole until all four ovals have a hole in the same place. Stack the large circles and poke a hole in the center. Do the same with the small circles. Enlarge all the holes slightly with the nail. The pieces must fit tightly in place on the skewer.
Take two of the ovals — be sure the corrugation runs in different directions on each — and hot glue them together, but don’t put glue over the hole. Repeat with the other ovals, circles and rectangles. Fit the rubber bands on the ovals and the large circle like tire treads.
Poke the holes through the sides of the box for the skewer to go through. The holes should be about 1 inch from the outside edge so that the oval gears will have room to turn when they are placed on the skewer. Make the holes just big enough so the skewer can turn easily.
Slide the sharp end of the first skewer into the box and carefully force one of the ovals onto the skewer. Repeat with the second oval, making sure that one oval hangs down and the other sticks up. Slide them to about ½ an inch apart on the skewer. Hot glue them to the skewer.
Poke a hole in the top of the box that will place the second skewer straight down between the two oval gears. Enlarge the hole so the straw will fit snugly through. Force the large circle tightly onto the second skewer and slide it toward the bottom of the skewer. Put the skewer up through the straw so that the pointed end comes out the top of the box. Adjust the circle so that it rests on the oval gears with the skewer end hanging even with the lowest gear. Put a little hot glue on the skewer where it passes through the circle to hold it tightly in place.
Test the gears by turning the skewer where it comes out the side of the box. The vertical skewer should turn back and forth, and go up and down. Slide the smaller circles on each side of the first skewer on the outside of the box and hot glue them in place to hold the skewer in place.
Create the handle on the sharp end of the skewer by gluing the cardboard rectangle and nail in place. Test the handle and gears again once the glue has fully cooled.
Now you can create the snowman by putting the marshmallows on the top skewer and gluing them in place. Add decorations to your snowman as desired. Now turn on a holiday tune and crank the handle to make your snowman dance!
Note: For older kids, use a longer box with a long, thin dowel, and add even more gears and wheels. Experiment with different shaped gears and placement of the gears on the dowel to see how the movement changes. You can also do an internet image search on the words “cam shapes” for ideas.
2. Hydrophobic sand
SUPPLIES:
- Hydrophobic sand
- Fabric protector spray (like Scotch Guard)
- Craft Sand
- Foil
- Water
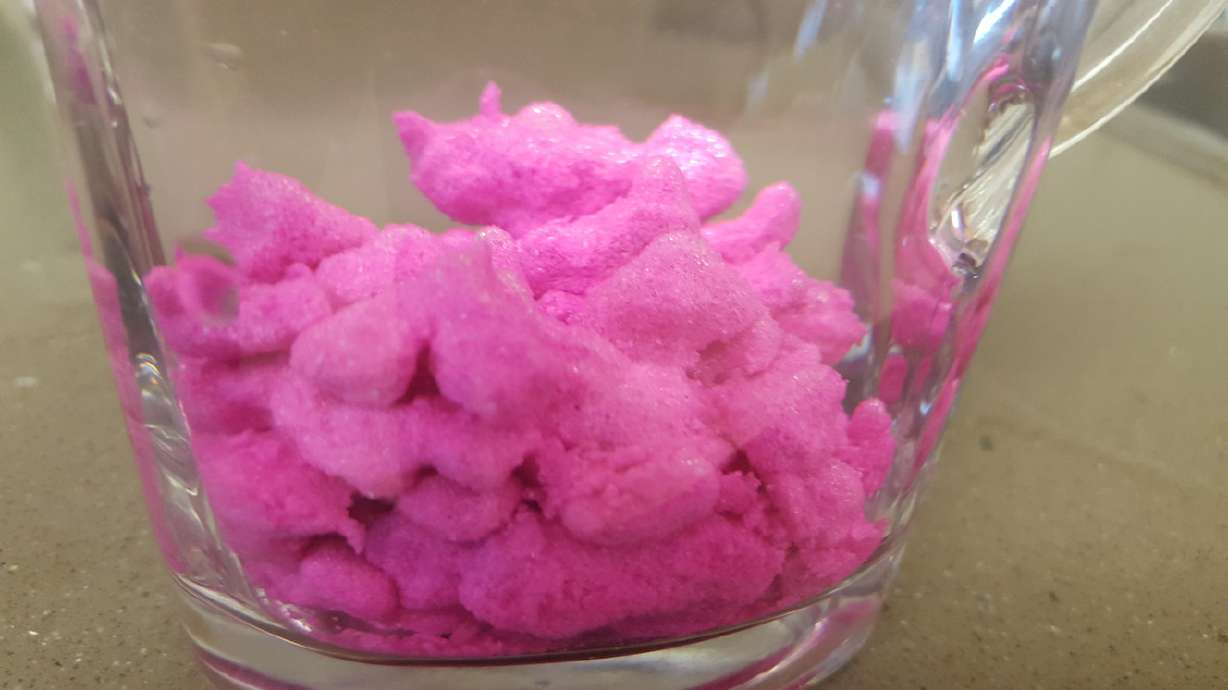
- Glass Lay sand out in a thick layer on foil and spray with the fabric protector. Shuffle sand around and spray again until well coated. Let dry. Fill a clear glass container with water and drop the treated sand into the water. The sand should clump and form shapes. The spray coats the sand and it will repel the water and stay dry.
Notes: Why does the sand behave this way? What happens if you didn’t coat the sand with spray first before putting it in the water?
3. Centrifuge water pump
SUPPLIES:
- Bowl or cup of water
- Straw
- Wooden skewer
- Tape
- Scissors Grab a ruler and mark a straw into three equal sections. Cut the straw half way through at the marks. Push a wooden skewer through the center of the straw.
Fold into a triangle by bending the two ends of the straw together and tape to the skewer. Place the pointy end of the skewer into a bowl or cup of water and spin.
Notes: This is the way a lot of pumps in the real world work. Spinning the straw forces the water inside to spin. When an object spins, anything in or on that object is pushed outwards. The only way the water can move outwards is to move up in the straw - it is pumped upwards. You feel this same force on a merry-go-round.
4. Winter sensory bag
SUPPLIES:
- Quart-size, sealable plastic bag (Ziploc quart-size freezer bags work well)
- Hair gel (you can also use baby oil or cooking oil)
- Water
- Duct tape
- Food coloring
- Items to put in the bag: tinsel, plastic snowflakes (but you can put many other things in the bag ie. glitter, confetti, bells, foam shapes, etc.)
Empty a tube of hair gel in a bowl. Add a few drops of food coloring and mix it up. Then mix in items for the bag. For this bag, we added tinsel and plastic snowflakes. Add some water for your desired consistency, the more water, the less firm the sensory bag will be. Put the contents of the bowl into a plastic bag.
Seal the bag and press it to get all the air out. Put the bag flat on the table and fold over the top of the bag. Then tape duct tape to all sides of the bag to prevent it from breaking.
Notes: Sensory bags are great for children to use their creativity and senses. Some ideas to add extra STEM components are: gather items outside (like leaves) for the bag, have your child count how many items are in the bag, have them mix food coloring or different types of liquids and see what happens.
5. Floating icicles
SUPPLIES:
- PVC pipe ½ an inch in diameter or larger and about 2 feet long
- 6 thin mylar “icicles”
- A clean head of hair
Rub the PVC pipe through clean hair to “charge” it with static electricity— you will hear it crackle. Hold the knotted icicle several feet above the PVC pipe and let it drop toward the pipe. It should come near the pipe then bounce up into the air. If it sticks to the pipe, repeat rubbing the pipe across your hair. Once the icicle is floating, use the pipe to keep it in the air.
Notes: What is static electricity? Why does the icicle float in the air?
Do you know of any other fun STEM activities you can do at home? Let us know in the comments.
Contributing: Mindy Hiatt and Susan Jeppesen


