Estimated read time: 5-6 minutes
This archived news story is available only for your personal, non-commercial use. Information in the story may be outdated or superseded by additional information. Reading or replaying the story in its archived form does not constitute a republication of the story.
Thanks to The Potters’ Place for providing this article.When we moved into our new home a couple of years ago one of the things we were most excited about was the size of the pantry. It has ample storage and counter space to store all of our food and much of our kitchenware. It really was perfect but needed a little organization and, better yet, some cabinet doors to cover the lower storage areas where we keep our small appliances, mixing bowls and other things we don't use daily so we would only see our food storage and the decor on the top shelf.
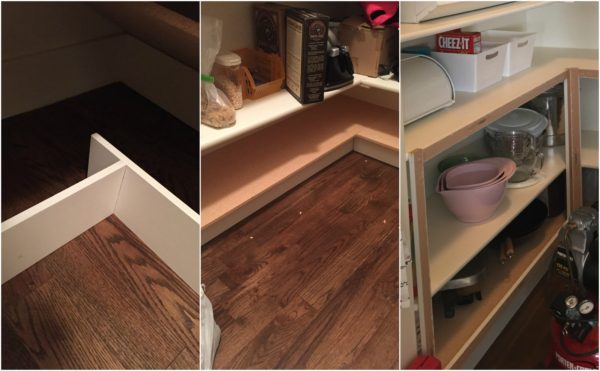
Now, I have to say I'm not a carpenter and don't know much about building things. So I am no expert, but I do know how to use few tools and I like to learn. With the help of my uncle Gary, I thought I'd see what changes we could make to improve the look and function of my pantry space. We added the bottom shelf and then framed out the cupboards with wood strips. We added some doors which are nothing fancy and are just a little bigger than the size of the opening. I bought the hinges and handles on eBay for a final touch. Now, learn from my mistake! I used cheap wood for the framing around the lower shelves and had to start all over because it didn't hold up. I ended up using Baltic Birch, which worked perfectly. Make sure to use Baltic Birch or another hard wood that is strong enough to support the weight of the doors.

I stained and then attached cedar planks, similar to what would be used for fencing, to the top shelf to give character to the counter top. I didn't remove the existing shelf but just glued and nailed the cedar to the top of it, and leaving a small overhang. The cedar is more durable than the MDF under it and serves as a sturdy countertop that looks better than the plain MDF.

Now came the fun part: organizing my new, prettier space.


I made a DIY shopping list holder by simply painting a 1"x 4" piece of wood and then attaching a roll of adding machine paper with string finished off with 4" section of a ruler. The ruler has a straight edge on the bottom so with your paper under it, you are able to make a nice, clean tear with a neat edge on your shopping list when you take it to the store. You can find the adding machine paper at most office supply stores.

The light was also a DIY project. I simply used the existing 3-bulb ceiling-mounted light fixture and an extra lampshade I had and then I covered the lampshade with a lightweight fabric. Make sure the lampshade is big enough that it won't touch any of the bulbs when it's hung. If it does touch the bulbs, it will be a fire hazard.

To attach the lamp shade to the existing fixture, I removed the threaded bolt from ceiling fixture and took it to my local home improvement store so I could buy a new one that is the same size around but is longer to use as my center pin. I guessed on the length because it needed to be long enough for the shade, but not so long it came through the bottom once the shade was in place. In addition to the center pin, I also purchased a washer and a bolt. I then replace the shorter center pin with the longer one. It was a bit tricky, but with some patience, it worked perfectly. Again, the critical thing to pay attention to is making sure your shade DOES NOT touch the light bulbs! Safety first people!

I have a few things I love to collect and rolling pins is one of them. I love the different shapes, sizes and textures they can be found in. I love to think about their history. I keep them in this pretty crock I found.

This fruit/vegetable organizer was purchased at the Pottery Barn. This, too, can be a DIY project if you want to save some money and make one on your own. You can probably find plans online. The organizer makes it super easy to see what we already have for dinner or a snack. It also makes it easy to see what I need when I go grocery shopping too.

One of my biggest pet peeves was the pantry door being left open with the light on. We swapped out the regular light switch for a motion sensor switch to solve the light part of the problem and to save energy.

We removed the standard hinges and the door trim. We then cut the side of the door down to accommodate double action hinges, which allows the door to swing both directions. Now we have a swinging door that is always shut and a light that turns on automatically when we enter the pantry and off when we leave. No more wasting electricity or open doors.

My favorite part of the pantry makeover is the candy containers, which I found at Target. It is also our friend's and family's favorite part, as well. We all know moms like to hide in the pantry to have a quick treat.

Don't be afraid to get your hands dirty and learn new skills to turn the pantry you have into the pantry you want!
Need help with a remodeling project? Find a professional today atKSL Classifieds.


